Schnapps

Schnapps
Our mascot - ALWAYS!

Sunday, April 29, 2012

Introducing the Basket of Love Beanie!

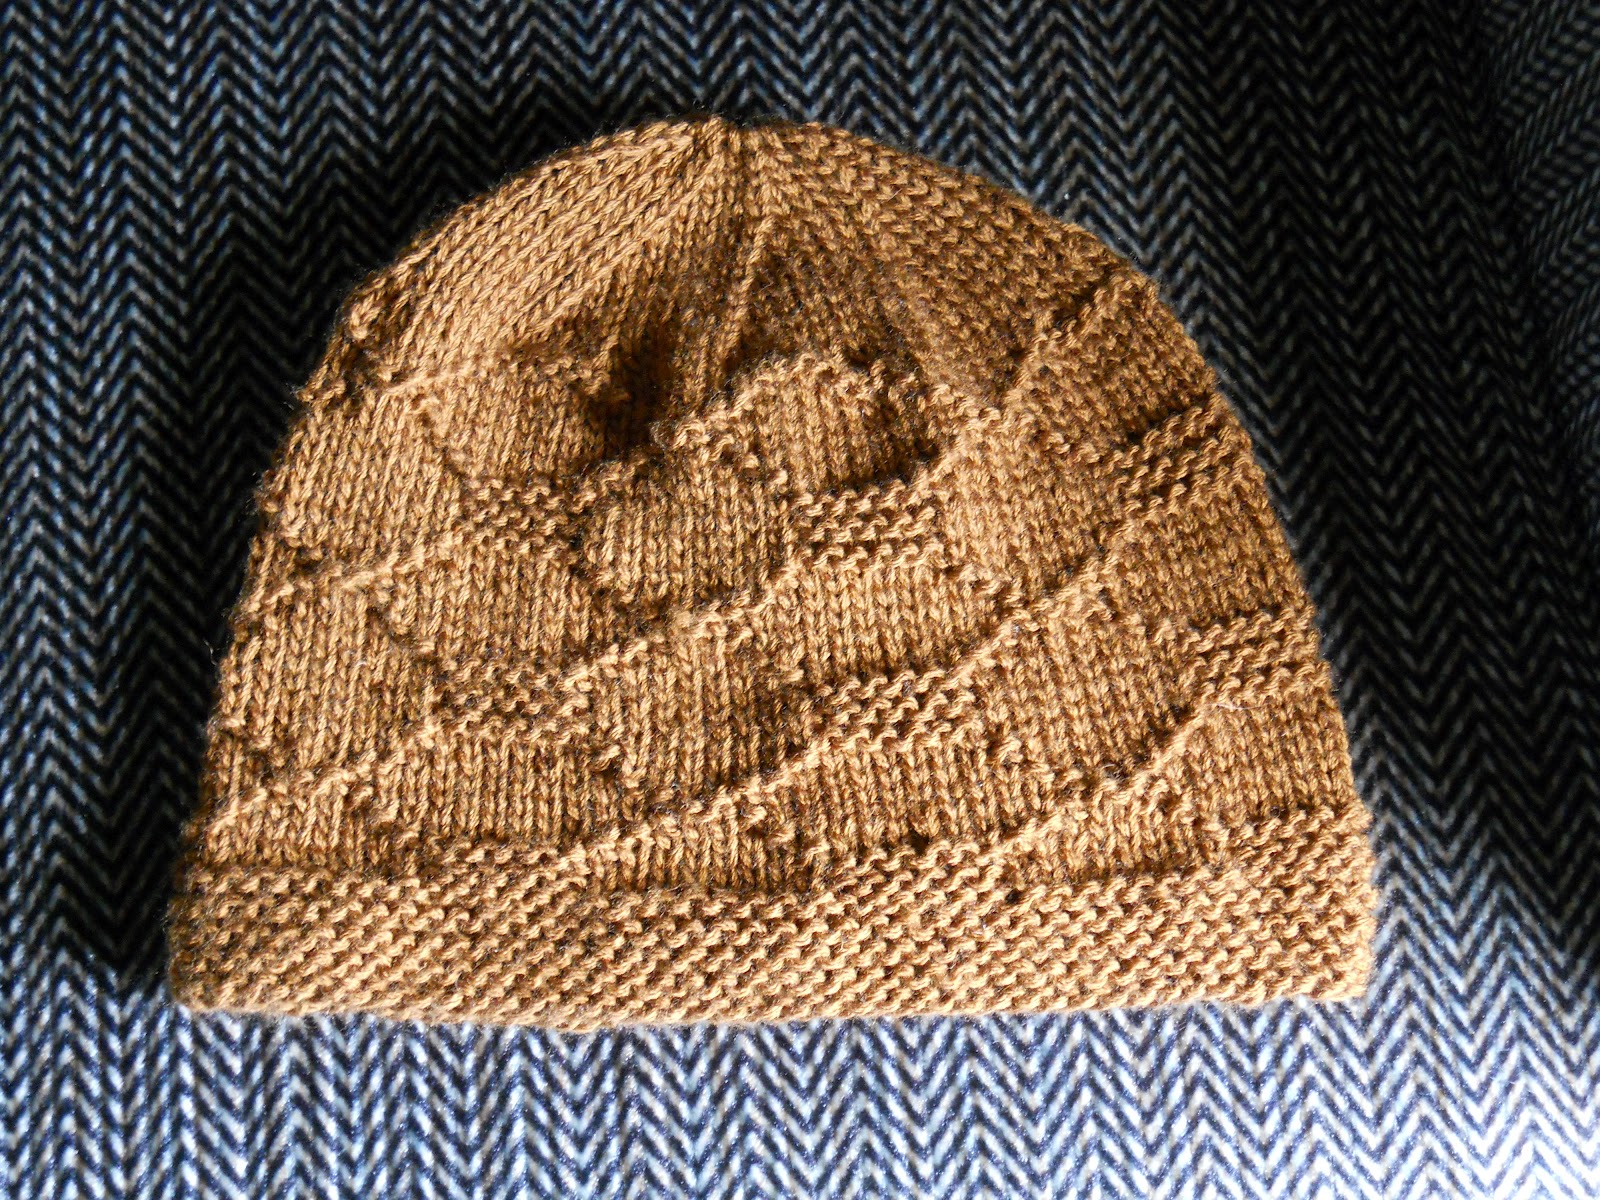
I've worked out the kinks in this pattern and am now happy to share it here.  This is a super simple knit and purl design that has a great texture that would work well for both men and women.  It would also work for children too.  Vary the yarn and have a ball with it!  I whole heartedly thank the Delaware Head Hugger Facebook family for helping me name this one.


As always, the pattern is free, but I do ask you to come to our Facebook page and like us and follow along with us as we deliver thousands of hats to people across the country. We're a friendly group - stop by, share your stories, post photos of your latest work or just say HI!


The Basket of Love Beanie


Size 10.5 US circular knitting needles
5-weight yarn – less than 100 yards

Abbreviations:  K2tog – Knit 2 stitches together

Begin:
Cast on 60 stitches and join in the round, being careful not to twist stitches.

Work Garter Stitch Brim
            Row 1:  Knit all stitches
            Row 2:  Purl all stitches
            Repeats Rows 1 and 2 three more times for a total of 8 rows

Work Body of Hat
            ALL odd rows (right side of work) are worked by knitting all stitches

            Rows 2, 4, 6, 8, 10 and 12:                           
                                  * P3, K3*; repeat from * to * across row
            
 Rows 14, 16, 18, 20, 22 and 24:             
                                  * K3, P3*; repeat from * to * across row
           
          Row 25:                  Knit all stitches
Row 26:                  Knit all stitches
Row 27:                 *K4, K2tog*; repeat from * to * across row
Row 28:                  Knit all stitches
Row 29:                 *K3, K2tog*; repeat from * to * across row
Row 30:                 *K2, K2tog*; repeat from * to * across row
Row 31:                 *K1, K2tog*; repeat from * to * across row

Finish:
            Cut working yarn, leaving a long tail.  Draw the tail through the stitches left on the needles and cinch closed.  Secure, weave in ends and give a basket of love to someone!


If you want to knit this hat flat, it is an easy adjustment.

Since the pattern alternates columns, the pattern is basically the same.

Begin:
Cast on 62 stitches.  The extra 2 stitches are your selvedge stitches – you will knit the first and last stitch of every row of the body pattern.

Work Garter Stitch Brim
            Row 1:  Knit all stitches
            Row 2:  Knit all stitches
            Repeats Rows 1 and 2 three more times for a total of 8 rows

Work Body of Hat
            ALL odd rows (right side of work) are worked by knitting all stitches
 
            Rows 2, 4, 6, 8, 10 and 12:     
                        K1, *P3, K3*; repeat from * to * to last stitch, K1

            Rows 14, 16, 18, 20, 22 and 24:             
                        K1, *K3, P3*; repeat from * to * to last stitch, K1
          
           Row 25:   Knit all stitches
Row 26:    Purl all stitches
Row 27:    K1,*K4, K2tog*; repeat from *to* to last stitch, K1
Row 28:    Purl all stitches
Row 29:    K1,*K3, K2tog*; repeat from *to* to last stitch, K1
Row 29:    Purl all stitches
Row 30:    K1,*K2, K2tog*; repeat from *to* to last stitch, K1
Row 31:    Purl all stitches
Row 32:    K1,*K1, K2tog*; repeat from *to* to last stitch, K1


Finish:
            Cut working yarn, leaving a long tail.  Draw the tail through the stitches left on the needles and cinch closed.  Secure, seam the back, weave in ends and give a basket of love to someone!


 Happy Knitting Everyone!


Remember, all are welcome to join us in some way - we love to see new people and are grateful when more people hear about us.  So, spread the word!  And, as always, if you or anyone you know is in need of chemo caps, please feel free to contact me directly at robin@delawareheadhuggers.org and I will be happy to ship some out. 


Delaware Head Huggers  

www.delawareheadhuggers.org 

Delaware Head Huggers on Facebook


Kozy Kovers for Kids

www.kozykoversforkids.org


Saturday, April 28, 2012

Goal Met - Week 17!

I wasn't sure I'd manage to get these done this week, because I hurt my shoulder, but I made it!  And I have heard from so many wonderful people this week as well.  I'm amazed at how many people take the time to send an email and say HI.  :)  Thank you!

The first one I did this week is the Stepping Stones Cap.  I had pictured it a bit differently, but it's workable.  It's a close fitting hat, so if you want to adjust it at all, make the stockinette brim a few rows longer than the pattern calls for.  The pattern is in a previous post.

The Stepping Stones Cap

Then I tried this pattern......which has no name at this point. I'm adjusting the pattern a bit before I post it, but I think it's really cute.  And it's very easy too.  I've cast on another one and should get it finished this weekend.  I'll post it once I'm finished..............if I can decide what to name it.......  :)


Off to spend the day with family and get some knitting done too. 

Happy Knitting Everyone!

Remember, all are welcome to join us in some way - we love to see new people and are grateful when more people hear about us.  So, spread the word!  And, as always, if you or anyone you know is in need of chemo caps, please feel free to contact me directly at robin@delawareheadhuggers.org and I will be happy to ship some out. If you know a center who would benefit from hats, please pass that information along to me, so I can send some hats out to them.
 
Delaware Head Huggers  
 
Kozy Kovers for Kids

Wednesday, April 25, 2012

Stepping Stones Cap

Well, I've been imagining a hat using this pattern for quite some time and it's just not the way I had pictured it.  But, it is a nice, comfy hat that would be a great chemo cap.  It's kind of a variation of the Cozy Cobblestone Cap that I made a while ago, but this one is a bit different and it's knit in the round.

The pattern is, of course, free.  As always, I ask that if you like the pattern, come by our Facebook and like us and follow along with us as we try to make a difference.  The pattern can be found as a PDF here.
Now, for the pattern!

Stepping Stones Cap


What you need:

Worsted weight yarn – less than 200 yards
Size 8 circular knitting needles

Abbreviations:

K2tog:  Knit 2 stitches together as one.

SSK:  slip, slip, knit.  Slip 2 stitches from the left hand needle onto the right.  Then insert the left hand needle into the front of the 2 slipped stitches and knit both together.


Cast on 95 stitches, place marker and join in the round, being careful not to twist stitches.

Work rolled brim:

            Rows 1 – 5:              Knit all stitches

Work body of hat:

            Rows 1 – 4:                  Knit all stitches
            Rows 5 - 10:              * K9, P5, K4 *; repeat from * to * to last 5 stitches, K5
            Rows 11 – 16:               Knit all stitches
            Rows 17 – 22:            * P5, K13 *; repeat from * to * to last 5 stitches, K5
            Rows 23 – 28:               Knit all stitches
            Rows 29 – 34:            * K9, P5, K4 *; repeat from * to * to last 5 stitches, K5

Decrease Crown:

            Row 1:                        * K2tog, K16 * ; repeat from * to * to last 5 stitches, K5
            Row 2:                           Knit all stitches
Row 3:                        * K7, SSK * ; repeat for row
Row 4:                        * K6, SSK * ; repeat for row
Row 5:                        * K5, SSK * ; repeat for row
Row 6:                        * K4, SSK * ; repeat for row
Row 7:                        * K3, SSK * ; repeat for row
Row 8:                        * K2, SSK * ; repeat for row

Finish:

            Cut working yarn leaving 6-inch tail.  Draw yarn through stitches left on needle and cinch closed.  Secure, weave in ends and enjoy!


Happy Knitting Everyone!

Remember, all are welcome to join us in some way - we love to see new people and are grateful when more people hear about us.  So, spread the word!  And, as always, if you or anyone you know is in need of chemo caps, please feel free to contact me directly at robin@delawareheadhuggers.org and I will be happy to ship some out. If you know a center who would benefit from hats, please pass that information along to me, so I can send some hats out to them.
Delaware Head Huggers  

Kozy Kovers for Kids


Friday, April 20, 2012

Goal Met Week 16! 2 hats, 1 blanket and a Happy Birthday to Schnapps!

Well, it's Friday and I've met my goal for the week.  I finished the Kuddly Kover and posted the pattern in a previous blog:


I also completed two hats and I am working on a new pattern too, but that's not quite finished yet........hopefully it will come out the way I'm imagining it and then I will post that pattern too!


Tomorrow, Saturday, April 21, 2012 is Schnapps' 8th birthday!!!  I can't believe that he is 8 already.......  So, since he's so special to me, I decided to post some of his pictures too!  It's not like I have a lot of them to share or anything. 

Catching up on his beauty sleep!

Wearing his squall jacket!

Me & My Baby!

Sleepy Schanuzer!


Very intent on the park up ahead!

In the car!

Waiting to go home after a walk!

Outside ready for fun!

Waiting for Daddy to come home!
Wooly and wearing a cowl in the winter!

Out on the deck, watching the squirrels!  


Kisses for Everyone!

Hope they made you smile!!!

Happy Knitting Everyone!

Remember, all are welcome to join us in some way - we love to see new people and are grateful when more people hear about us.  So, spread the word!  And, as always, if you or anyone you know is in need of chemo caps, please feel free to contact me directly at robin@delawareheadhuggers.org and I will be happy to ship some out.  Please let me know if you are aware of a chemo center who would benefit from a box of hats.......I'd love to ship some out!
 
Delaware Head Huggers  
 
Kozy Kovers for Kids

Wednesday, April 18, 2012

Introducing the Kuddly Kover!

I did it!  I designed my own blanket pattern for Kozy Kovers for Kids!  I like the way it turned out too.

I used 2 pounds of Lion Brand Pound of Love for this, but any worsted weight yarn would do.  I have at least enough yarn left over to make another blanket, so if you wanted to, you could just double your strands of one pound and you'd be fine.

 I tried to give this a little texture around the eyelet openings.  I hope you can see it in this picture, when the blanket was just begun. I think the eyelets are just the right size for young fingers to grasp onto this blanket.  This one will go to a foster child or a child in crisis and I hope that it will bring some comfort during a traumatic time.


Here is another photo of the blanket as well.  The finished blanket is 40 x 34.  It can easily be adapted to be larger or smaller just by knitting more or fewer repeats of the body pattern.  


This pattern is free, of course, for all to enjoy.  I hope that some of you will make it to donate to a child in need.  I also ask that you stop by our Facebook page and 'like' us.  Follow along with us as we make a difference.

Now, for the pattern:

If you have any trouble printing this, there is a PDF available .

Kuddly Kover 

Please vote from above!


Size 15 circular knitting needles

Worsted weight yarn – I used 2 Lion Brand Pounds of Love and I have enough left for at least one more blanket

Stitch Explanations:
           
P2tog:            purl 2 stitches together
yo:                        yarn over


Cast On:

Holding 2 strands of yarn together as one, cast on 5 stitches, place marker, cast on 65 stitches, place marker, cast on 5 stitches.  There will be a total of 75 stitches.  First 5 stitches and last 5 stitches make the garter stitch border.  


Knit Border:

            Row 1:              Knit every stitch
            Repeat Row 1 five more times for a total of 6 rows.


Knit Body of Blanket:
            Row 1:              Knit every stitch
            Row 2:              K5, purl to last 5 stitches, K5
            Row 3:              Knit every stitch
            Row 4:            K5, purl to last 5 stitches, K5
            Row 5:              Knit every stitch
  Row 6:            K5, purl to last 5 stitches, K5
            Row 7:              Knit every stitch
  Row 8:              Knit every stitch
  Row 9:            K5, * P2tog, yo *; repeat from * to * until the last 5 stitches, K5
  Row 10:              Knit every stitch
  Repeat Rows 1 – 10 until the piece measures approximately 36 inches in length. 
  Then repeat Rows 1 – 6 one more time.

Knit Garter Stitch Border:
  Row 1:              Knit every stitch
            Repeat Row 1 five more times for a total of 6 rows.

Finish:
            Bind off all stitches and weave in yarn ends.


Remember, all are welcome to join us in some way - we love to see new people and are grateful when more people hear about us.  So, spread the word!  And, as always, if you or anyone you know is in need of chemo caps, please feel free to contact me directly at robin@delawareheadhuggers.org and I will be happy to ship some out. If you know a center who would benefit from hats, please pass that information along to me, so I can send some hats out to them.
Delaware Head Huggers  

Kozy Kovers for Kids
 
 Happy Knitting Everyone!


Saturday, April 14, 2012

Introducing the Lucky Dots Hat!

This hat was designed and knit on Friday the 13th, hence the "lucky in its name!  It uses the Alternating Dots stitch pattern too, which explains the rest of its name!

I used one skein of Vanna's Colors and had a decent amount left over.  Since I managed to purchase the yarn at the amazing price of $1.44 per skein, I was very excited to see that an entire hat could be made using less than the 101 yards!!  Here is a close up of the stitch definition.....I hope it's clear enough.  This is a nice chemo cap as well as being just a nice hat!


 The pattern is, of course, free.  As always I ask that if you like the pattern, come by our Facebook and like us and follow along with us as we try to make a difference.  The pattern can be found as a PDF here.


Now, for the pattern!
 
The Lucky Dots Hat

Size 10.5 circular knitting needles

5-weight yarn – about 100 yards


Cast on 55 stitches

Work Ribbed Brim

            Row 1:            * K3, P2 *; repeat across row
            Row 2:            Repeat Row 1
            Repeat Rows 1 & 2 until the piece is 2 inches long

Work Alternating Dots Pattern:

            Row 1:            Knit all stitches
            Row 2:            K1, * P1, K1 *; repeat from * to * across row
            Row 3:            Knit all stitches
            Row 4:            P1, * K1, P1 *; repeat from * to * across row           
            Repeat Rows 1 – 4 until piece measures between 7.5 and 8 inches in length.

Decrease for the crown:

            Row 1:            * K3, K2tog *; repeat across row
            Row 2:               Purl all stitches
Row 3:            * K2, K2tog *; repeat across row
            Row 4:               Purl all stitches
Row 5:            * K1, K2tog *; repeat across row


Finish:

            Cut working yarn, leaving a 6-inch tail. 
Draw the tail through the remaining stitches on the needles.  Cinch closed.
Weave in ends.
Enjoy!
  
Happy Knitting Everyone!


Remember, all are welcome to join us in some way - we love to see new people and are grateful when more people hear about us.  So, spread the word!  And, as always, if you or anyone you know is in need of chemo caps, please feel free to contact me directly at robin@delawareheadhuggers.org and I will be happy to ship some out. If you know a center who would benefit from hats, please pass that information along to me, so I can send some hats out to them.
Delaware Head Huggers  
Kozy Kovers for Kids
 

Goal Met - Week 15!

The year is flying by, but I'm managing to stay on track and get my hats finished!  This week I even designed two new ones and started designing my first blanket!! We're trying to win a contest too, so we can use the money for postage and supplies!

If anyone is willing and able, please vote for this idea.......it does not matter where you are located - you may vote in the popular vote.........if it wins, the money will be donated to Delaware Head Huggers/Kozy Kovers for Kids to pay for postage and supplies. :) 
YOU MUST BE SIGNED IN TO THE MARYLAND PRIZE SITE TO VOTE. IF YOU VOTE WHILE NOT SIGNED IN, THE VOTE WILL NOT BE COUNTED. Being signed into FB is NOT enough. I know this is confusing and aggravating........PLEASE DO NOT GIVE UP! If you have voted when not signed in, please vote again!!!
Please go to the link, go sign in at the upper right hand corner (you can use your FB log in) and give him a Thumbs Up.....the thumbs up will turn green if you have voted.  THANK YOU!!!!!  The idea to vote for is by Paul Celli and it is called Helping to Prevent Delayed Transfusion Reactions
https://themarylandprize.maryland.spigit.com/Page/ViewIdea?ideaid=108

The first one I made this week was the Stylish Tiles hat.  That pattern has already been posted.  It's knit flat using a worsted weight yarn.  I think the solid color highlights the stitch definition, but I'm sure it would look great in a variegated yarn too.


The second hat this week is the Lucky Dots Hat.  This one was made on Friday the 13th, hence the "lucky" and it uses an alternating dots stitch.  It's knit on circulars using a 5-weight yarn.  That pattern will be posted in a new post.


I have also been working towards my goal of 4 blankets for Kozy Kovers for Kids this year too.  I have started a new pattern for a blanket.  I will post that pattern when I'm finished.  I like that it has some texture around the eyelets.........it's just a bit different I think.  Here is the progress so far.............


Remember, all are welcome to join us in some way - we love to see new people and are grateful when more people hear about us.  So, spread the word!  And, as always, if you or anyone you know is in need of chemo caps, please feel free to contact me directly at robin@delawareheadhuggers.org and I will be happy to ship some out.  Please let me know if you are aware of a chemo center who would benefit from a box of hats.......I'd love to ship some out!
Delaware Head Huggers  
Kozy Kovers for Kids
 
Happy Knitting Everyone!

Thursday, April 12, 2012

The Stylish Tiles Hat

I've been wanting to get this hat pattern done since I first saw the tiles pattern.  I thought it would look best in a solid color.........that shows off the stitches a bit better.  I used donated yarn, so I can't give an exact amount for yardage.  This hat is stretchy enough to fit most adults.  Hope you like it!

As always, the pattern is free, but I do ask you to come to our Facebook page and like us and follow along with us as we deliver thousands of hats to people across the country.

If you have trouble printing this, it is available as a PDF here.


The Stylish Tiles Hat


Size 8 knitting needles


Worsted weight yarn – I used yarn that was donated and did not have a label, but I’d say less than 200 yards would be fine.


Cast on 86 stitches


Work garter stitch brim:


         Row 1:                    Knit every stitch

         Rows 2-8:               Repeat Row 1


Knit body of hat by working tiles pattern:


Row 1:           K1, * K4, P6, K4 *; repeat from * to * to last stitch, K1

Row 2:           Purl all stitches

Row 3:           K1, * K4, P6, K4 *; repeat from * to * to last stitch, K1

Row 4:           K1, * P3, K1, P6, K1, P3 *; repeat from * to * to last stitch, K1

Row 5:           K1, * K2, P1, K8, P1, K2 *; repeat from * to * to last stitch, K1

Row 6:           K1, * P1, K1, P10, K1, P1 *; repeat from * to * to last stitch, K1

Row 7:           K1, * P1, K12, P1 *; repeat from * to * to last stitch, K1

Row 8:           K1, * P1, K1, P10, K1, P1 *; repeat from * to * to last stitch, K1

Row 9:           K1, * K2, P1, K8, P1, K2 *; repeat from * to * to last stitch, K1

Row 10:         K1, *P3, K1, P6, K1, P3 *; repeat from * to * to last stitch, K1

Row 11:         K1, * K4, P6, K4 *; repeat from * to * to last stitch, K1

Row 12:         Purl all stitches


Repeat Rows 1 – 12 twice more for a total of 36 rows.


Decrease for crown:


Row 1:         K1, *K9, K3tog *; repeat from * to * to last stitch, K1

Row 2:         Purl all stitches

Row 3:         * K7, K2tog *; repeat from * to * across row

Row 4:           Purl all stitches

Row 5:         * K6, K2tog *; repeat from * to * across row

Row 6:           Purl all stitches

Row 7:         * K5, K2tog *; repeat from * to * across row

Row 8:           Purl all stitches

Row 9:         * K4, K2tog *; repeat from * to * across row

Row 10:           Purl all stitches

Row 11:         * K3, K2tog *; repeat from * to * across row

Row 12:           Purl all stitches

Row 13:         * K2, K2tog *; repeat from * to * across row

Row 14:           Purl all stitches

Row 15:         * K1, K2tog *; repeat from * to * across row


Cut working yarn leaving a long tail.  Draw the yarn through the stitches left on your needle, cinch closed and seam the hat.


 Happy Knitting Everyone!

Remember, all are welcome to join us in some way - we love to see new people and are grateful when more people hear about us.  So, spread the word!  And, as always, if you or anyone you know is in need of chemo caps, please feel free to contact me directly at robin@delawareheadhuggers.org and I will be happy to ship some out. 

Delaware Head Huggers  

Kozy Kovers for Kids